|
Restoration of Old Images Using the Healing Brush and Patch Tool
|
|
|
Project worth 25 points |
|
|
In this
lesson you will learn how to bring back old, damaged photos to a "like
new" condition. |
|
|
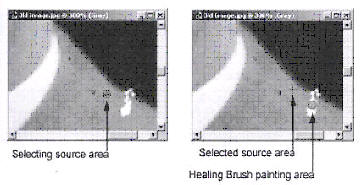
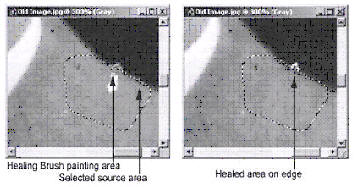
When you hold down the mouse button while painting, the selected source area will move relative to the Healing Brush. The Clone Stamp tool does not support this feature. If you need this flexibility, you can make the Healing Brush tool behave like the Clone Stamp tool. Click the Mode menu in the Healing Brush options bar, and select Replace. Using this selection allows you to also use soft-edge brushes. The Healing Brush tool and the Patch tool are not good at dealing with edges in an image. In the example above, you would run into problems as you tried to heal the area where the edge is. The problem is that these tools rely on the pixels around the selected source area for the retouching data, so when you paint you are effectively changing the area around and in the brush stroke, creating a smear effect. You can try to change the shape of the brush stroke or you could reduce the size of the brush, but this has its limits since the tools need to be able to select 9 pixels to work effectively. The best way to get around this problem is to make a soft-edged selection around the area that you want to repair. The Healing Brush and the Patch tool will behave like any other tool, affecting just the area in the selection, as shown below. When selecting your source area try to make a selection that straddles the selected work area, which makes for a cleaner edge. When you are done repairing inside the selection, simple invert the selection and work on the other side of the edge.
|
|
| Assignment: Choose one of the old photographs available in the Computer Art 2005 folder ( under tutorial images + old photos) and completely restore it using the Healing and Patch Tools. | |
|
Be sure to save your work in the folder marked "Old Photograph" in the finished work folder that is inside the Computer Art 2005 folder. |
|