|
Custom Layer Masks |
|
|
In this assignment, you will be making a tutorial image, and then completing one on your own. Each work is worth 25 points = 50 points total for this project. |
|
|
Follow the steps below to resize a custom layer mask and apply it to an image.
|
|
| 5. Click on the Channels palette and
then select the entire image. Copy the gray channel to the clipboard by
selecting the entire image and then selecting Copy from the Edit menu. 6. Go to the original image. Double-click on the background layer to make it a layer. Click on the Add Layer Mask icon in the Layers palette.
|
|
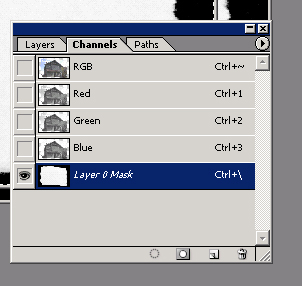
| 7.Go to the Channels palette. Select the
Layer 0 Mask channel and deselect the other channels, as shown. Now go to
the Edit menu and select Paste. Notice that the torn paper border now
appears in the Layer 0 Mask channel. Click on the RGB channel and then
click on the Layer 0 Mask channel to hide it.
|
|
|
|
|
| 8. Now click on the Layers palette. Create a
new layer. Move it below Layer 0 and then fill Layer 1 with black.
Notice you now have a torn paper effect around the image. Once you have completed this quick tutorial save your image of the Custom Layer Masks tutorial in the "Computer Art 2005" public folder under "Finished Work". Be sure to save the file in your name so I know who completed this lesson.
|
|
| 9.Now, make a custom layer mask image of your own by following the steps in this lesson and save a copy of your file within the "Finished Work " folder under Computer Art 2005. | |